Pelatihan Hardware, Input, Process, Output

Pelatihan Hardware, Input, Process, Output

Pelatihan Hardware, Input, Process, Output

Pelatihan Hardware, Input, Process, Output

Pelatihan Hardware, Input, Process, Output

Pelatihan Hardware, Input, Process, Output

Pelatihan Hardware, Input, Process, Output

Pelatihan Hardware, Input, Process, Output

Pelatihan Hardware, Input, Process, Output

Pelatihan Hardware, Input, Process, Output

Pelatihan Hardware, Input, Process, Output

Pelatihan Hardware, Input, Process, Output

Pelatihan Hardware, Input, Process, Output

Pelatihan Hardware, Input, Process, Output

Pelatihan Hardware, Input, Process, Output

Pelatihan Hardware, Input, Process, Output

Pelatihan Hardware, Input, Process, Output

Pelatihan Hardware, Input, Process, Output

Pelatihan Hardware, Input, Process, Output

Pelatihan Hardware, Input, Process, Output

Pelatihan Hardware, Input, Process, Output

Pelatihan Hardware, Input, Process, Output

Pelatihan Hardware, Input, Process, Output

Pelatihan Hardware, Input, Process, Output

Pelatihan Hardware, Input, Process, Output

Pelatihan Hardware, Input, Process, Output

Pelatihan Hardware, Input, Process, Output

Pelatihan Hardware, Input, Process, Output

Pelatihan Hardware, Input, Process, Output

Pelatihan Hardware, Input, Process, Output

Pelatihan Hardware, Input, Process, Output

Pelatihan Hardware, Input, Process, Output

Pelatihan Hardware, Input, Process, Output

Pelatihan Hardware, Input, Process, Output

Pelatihan Hardware, Input, Process, Output

Pelatihan Hardware, Input, Process, Output

Pelatihan Hardware, Input, Process, Output

Pelatihan Hardware, Input, Process, Output

Pelatihan Hardware, Input, Process, Output

Pelatihan Hardware, Input, Process, Output

29 March 2009

How to Protect File With Image File

Create your save file is like a secret, so confused I need folder search software protection etc, and here I will give you simple tips how to hide your confidential files to an image file. very simple to do but make sure that the computer before you installed WinRAR.


Step as follows:

Step 1:

Collect the files that you want to hide in and compress so one using winrar.
Suppose name file1.rar

Step 2:

Prepare an image file type jpg
Suppose name gambar.jpg

Step 3:

Put the two files are files gambar.jpg and a file1.rar in the same directory.
eg in Drive D: \ DATA

Step 4:

Open command prompt and type:
D:\DATA> copy/b gambar.jpg + file1.rar privat.jpg

Step 5:

After that will create a new file with the name privat.jpg. Then you try to open the file privat.jpg. Overview of the difference will not have to file gambar.jpg property unless you increase the file size large. You can still open the file with the Picture Editor or Image Viewer you. There are no signs that actually have a secret inside.

Step 6:

How do I open the file you confidential?
Right-click on the file choose privat.jpg ago [Open With] [Choose Program] Undecided WinRAR and click [OK].
You will be able to view your confidential files and can extract as usual.

28 March 2009

Dual Boot Windows Vista & Windows XP

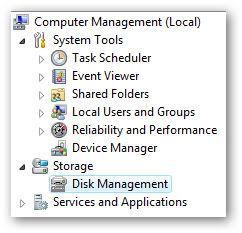
The first step that we need to do is create a new partition first, if we only have hardisk drive c: with the vista system is easy to use software without having to partition magic can be done: with the disk management as in the image below:
Disk Managementà1. Right click mycomputer then click Manage
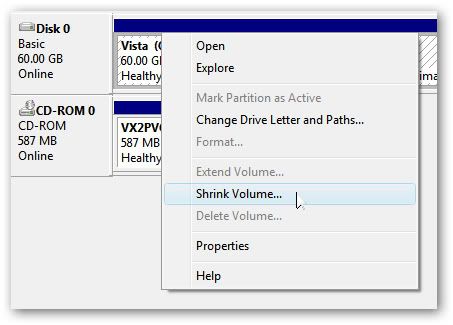
2. Create a partition with the right-click the path c: so it will appear shrink volume
3. Determine how much capacity it's up to the next GB will be used for the XP system
4. Then type format with NTFS
5. Follow the steps as below

Photobucket

Now we'll shrink our volume down by right-clicking on the main hard drive and choosing Shrink Volume.

Photobucket

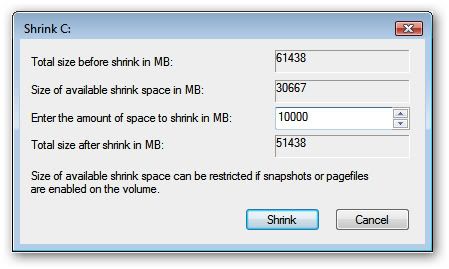
Now you can choose the size that you want to shrink, which really means you are choosing the size that you want your XP partition to be. Whatever you do, don't just use the default. I chose roughly 10gb by entering 10000 into the amount.

Photobucket

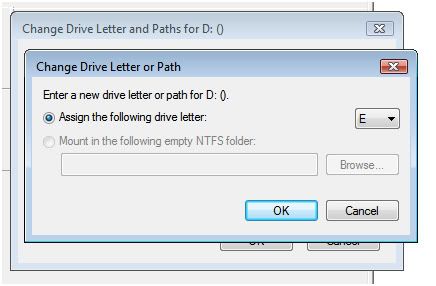
The next step might be confusing, because we need to change the cd-rom drive that's invariably taking up D: at the moment, because we want to use D: for the Windows XP partition, but it's already taken by the cd-rom drive. If you skip this step than XP will install onto the E: drive, which isn't the end of the world, but it's not quite as tidy.

Right-click on the cd-rom drive in the list and choose Change Drive Letter and Paths from the menu.

Now we'll change the CD drive to use E: by selecting that in the drop-down.

Photobucket

Now we can create a new partition for XP to live on and make sure that the drive letter is set the way we want. If you do not create a partition now the XP install will do so automatically, but it's easier and cleaner to do it this way.

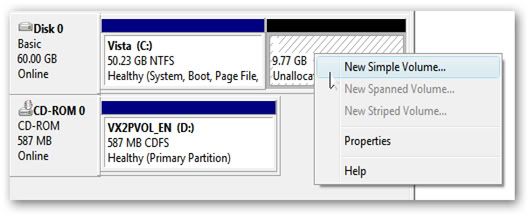
Right-click on the Unallocated free space area and then select New Simple Volume from the menu.

Photobucket

Follow through the wizard and select whatever options you'd like, making sure to use D: as the drive letter.

Now you will need to close out of disk management and reboot your computer. This is because we can't do the next step until we reboot. (you can try, but it won't work)

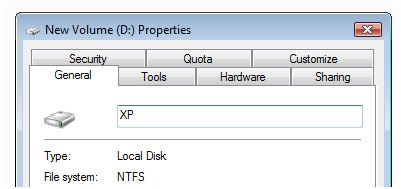
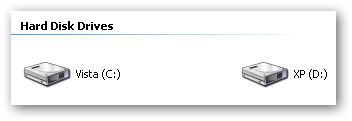
So we've come back from rebooting… open up Computer from the start menu and then right-click on the D: drive and select properties. Give your partition a meaningful name like "XP". It would be wise to name the C: drive to "Vista" at this point as well.

Photobucket

Now you'll want to pop your XP cd into the drive and boot off it. You may have to configure your BIOS to enable booting off the CD drive, or if your computer says something like "Hit Esc for boot menu" you might want to use that.

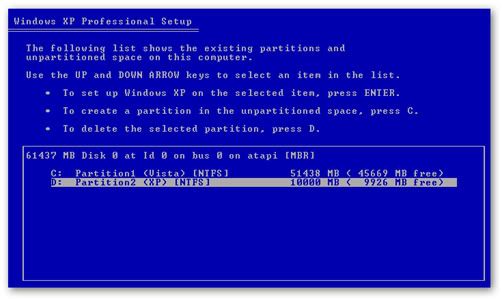
Once you come to the screen where you can choose the partition to install on, then choose either the unpartitioned space or the new partition you created. Whatever you do, don't try and install onto your Vista partition! See how much cleaner it is now that we've labeled each partition distinctly?

Photobucket

We'll assume XP is completely installed at this point, and you will have lost your ability to boot into Windows Vista, so we'll need to use the VistaBootPro utility to restore the Vista boot loader.

Download and install VistaBootPro from vistabootpro.org

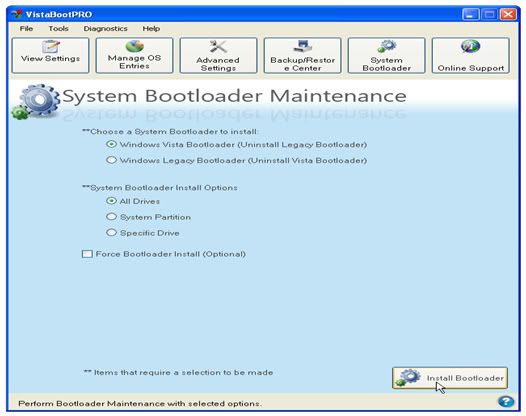
During the install you'll be forced to install the .NET 2.0 framework. Open up VistaBootPRO and then click on the System Bootloader tab. Check the "Windows Vista Bootloader" and then "All Drives" radio buttons, and then click on the Install Bootloader button.

Photobucket

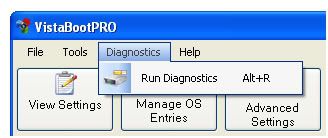
At this point, the Windows Vista bootloader is installed and you'll only be able to boot into Vista, but we'll fix that. Instead of manually doing the work, we'll just click the Diagnostics menu item and then choose Run Diagnostics from the menu.

Photobucket

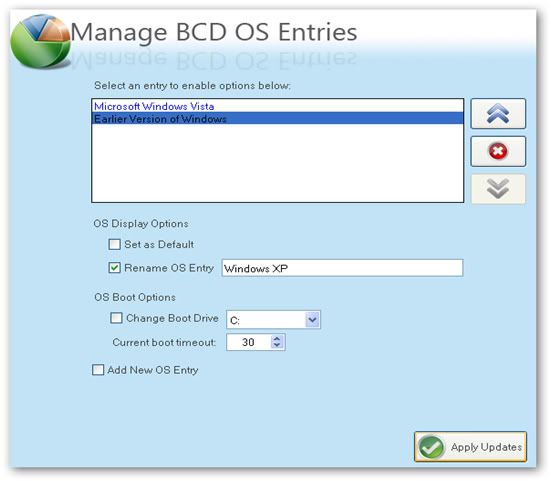
This will scan your computer and then automatically fill in the XP version.. click on the "Manage OS Entries" tab and then click in the textbox for Rename OS Entry, and name it something useful like "Windows XP" or "The Windows That Works"

Photobucket
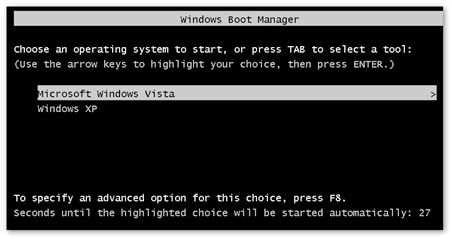
Click the Apply Updates button and then reboot your computer… you should see your shiny new boot manager with both operating systems in the list!

Photobucket
If you get an error saying "unable to find ntldr" when trying to boot XP, you'll need to do the following:

* Find the hidden files ntldr and ntdetect.com in the root of your Vista drive and copy them to the root of your XP drive.
* If you can't find the files there, you can find them in the \i386\ folder on your XP install cd

This is a critical piece of information: Windows XP will be installed on the D: drive, even in Windows XP… so you'll need to keep that in mind when tweaking your system.

Photobucket

You can share information between the drives, but I wouldn't recommend messing with the other operating system's partition too much… it might get angry and bite you. Or screw up your files. What I do recommend is that you store most of your files on a third drive shared between the operating systems… you could call that partition "Data".

I'm going to write a number of followup articles dealing with all of the issues with dual-boot systems, so subscribe to the feed for updates.

If you have issues with your dual-boot system, I'd recommend creating a new topic in our Vista forum, and we'll try and help you.

If you have issues with using the shrink volume feature, check this article for some tips

Make the USB Flash Disk immune virus


Most malware now spreads via USB flash disk. What happens if you insert a USB flash disk to your computer? with the autorun is active every time we insert the flash disk to the computer we will always show the dialog box that contains some examples of menu options such as open folder to view files with any posts underneath using windows explorer. You should note the options that you want to click or see all the options there. If there are strange like that have any posts using application, Start My Apllication. using the program provided on the device under the open folder to view files that means you should be suspicious that the USB flash disk you have terjangkiti malware, and what happens if you run, or click any posts have ascertained your computer akan terjangkiti or malware is contagious.
That is one of the methods used to spread malware with USB flash disk. A program can run automatically when we insert the USB flash disk to the computer because in the flash disk is a file called autorun.inf. Malware will make it to transmit or spread themselves to a computer USB flash disk dicolok. But with a few tips from pcplus this, one of the spread of viruses via USB flash disk can be prevented.

The steps are as follows:


1. Create ekplorer windows that display all files, including files that are hidden. By using the facilities to Tools> Folder Options> View and then clear the Hide Extentions for known file types.
2. Open the USB flash disk (make sure it is free of virus) and delete the file called autorun.inf.
3. Create a new folder with the name autorun.inf
4. Open the folder you just created and create a txt file using notepad with the name of any kind. Then rename the files using characters from Japanese, Korean or Chinese
5. If you have installed Ms Office is on your computer Click Start> Programs> Accessories> System Tools> Character Map. Then select the font Arial Unicode MS, Scroll down until you find the character of Japan, Korea or China is.
6. Ganda click on the selected character as much as about 5 characters, and then click copy.
7. Then rename the text file that you created earlier with merename and click paste so that the character will change into boxes, not the characters appear to Japan, China or Korea as a copy before we leave, but only, it is normal.
8. USB Flash disk you will be safe from malware virus atua.

How Safe?
Because malware can not make a autorun.inf file in a folder in the windows, may not have the same file name is not it? autorun.inf file because we already use. In addition, malware can be removed from memory because most malware is not ready with the condition that we have created earlier so that there were "unhandled exception error" which will be removed from memory by windows. Making a text file with file names using characters from Japanese, Korean and Chinese are not without reason, as malware often does not support Unicode characters so that these characters are considered fixed and malwarepun Windows will fail to delete the text file.

The hope that useful.

24 March 2009

PCMAV Valkyrie 2.0

Apa yang baru di PCMAV Valkyrie 2.0?


Splash screen PCMAV 2.0

Kebetulan pada PC Mild Edisi 6 2009 saya menerima CD bonus yang berisi Valkyrie 2.0 nah langsung saja saya mencobanya ternyata ada beberapa fitur baru termasuk fasilitas update dan submid to PC Media seperti yang pada versi Beta kemarin.

Hal-hal yang baru di PCMAV Valkyrie 2.0 diantaranya seperti berikut ini saya kutip dari Virus Indonesia dot com :


a. IMPROVED! Implementasi modul baru untuk manajemen operasi memory
dan pencarian file yang begitu cepat dan stabil.

b. NEW! IntelligentScan (iScan) engine for ClamAV untuk meningkatkan
akselerasi pendeteksian ketika engine ClamAV digunakan.
Pada PCMAV generasi 1.x banyak dikeluhkan mengenai betapa lambatnya
PCMAV ketika digabung dengan engine ClamAV. Untuk itulah kami
melakukan riset mendalam untuk mengembangkan sebuah engine tambahan,
yang diharapkan secara signifikan dapat meningkatkan performa PCMAV
ketika digabung dengan engine ClamAV. Hasilnya, terciptalah iScan
for ClamAV yang secara meyakinkan mampu meningkatkan performa scan
PCMAV+ClamAV hingga 40% lebih cepat. Buktikan sendiri!

c. NEW! RealTime Protector (RTP) for Vista dan Windows 7. PCMAV RTP
merupakan satu-satunya antivirus produksi Indonesia yang dapat berjalan
lancar dan stabil di Windows Vista. Khusus untuk Windows 7, walau cukup
berjalan lancar, RTP masih bersifat eksperimental mengingat Windows 7
sendiri yang masih berstatus Beta.

d. NEW! Virus Quarantine (karantina) untuk mengisolasi file-file yang
dicurigai bervirus ke tempat yang aman dan terlindungi sebelum
diambil tindakan lebih lanjut, seperti penghapusan maupun perbaikan
file. Jika ternyata file tersebut tidak berbahaya (false alarm),
maka dapat dikembalikan ke lokasi awal di mana file tersebut berasal.
Klik angka pada info Quarantined untuk masuk ke menu karantina. Folder
dan file “\quarantine\quarantine.dat” secara otomatis akan terbentuk
ketika PCMAV dijalankan untuk pertama kalinya di harddisk.

e. NEW! Virus Submit yang terintegrasi di menu Virus Quarantine.
Jika pada PCMAV generasi 1.x ditemukan file yang dicurigai (suspected)
maka Anda harus mengirimkan contoh file tersebut secara manual melalui
e-mail dengan sebelumnya dilakukan kompresi yang terpassword. Kini
keribetan tersebut tidak ada lagi. Fitur Virus Submit hadir untuk
mempermudah pengiriman otomatis file-file yang dikarantina ke PC Media.
Tinggal pilih file yang dimaksud di menu Virus Quarantine, lalu pilih
Submit. File yang berhasil dikirim akan dianalisa dan sesegera mungkin
dibuatkan update antivirus-nya berdasarkan skala prioritas.

f. NEW! PC Media Updates Manager untuk update online otomatis, baik
untuk file database virus PCMAV (update.vdb) maupun ClamAV
(main.cvd & daily.cvd).

g. IMPROVED! Integrasi awal PCMAV Cleaner & RTP. Proses awal PCMAV
Cleaner kini lebih cepat karena tidak lagi memeriksa memory/sistem
start-up Windows ketika RTP telah aktif. Dan untuk lebih menghemat
penggunaan memory, kini PCMAV Cleaner & RTP mampu menggunakan
memory bersama untuk database virus.

h. IMPROVED! Fitur scan melalui klik-kanan pada Explorer (/REGSHELL).
Bukan hanya file, kini folder juga dapat dilakukan scan dengan klik-kanan.

i. NEW! Fresh-Look dengan tampilan baru yang lebih simpel, cerdas,
informatif, dan tentunya menyenangkan.

j. BUG FIXED! Kesalahan deteksi (false alarm) heuristik pada beberapa
program dan script.

k. IMPROVED! Database virus utama (pcmav.vdb) kini dikeluarkan dari
modul utama dan bersama file update database virus (update.vdb)
diletakkan di folder “\vdb”

l. IMPROVED! Engine dan CVD tambahan ClamAV (0.9x) kini wajib
diletakkan di folder “\plugins\ClamAV”

m. IMPROVED! Ditambahkan database pengenal dan pembersih 54 virus
lokal/asing/varian baru yang dilaporkan menyebar di Indonesia. Total 2614
virus beserta variannya yang banyak beredar di Indonesia telah dikenal di
versi 2.0.0 ini oleh core engine PCMAV.

n. IMPROVED! Perubahan beberapa nama virus mengikuti varian baru yang
ditemukan.

o. IMPROVED! Perbaikan beberapa minor bug dan improvisasi kode internal
untuk memastikan bahwa PCMAV tetap dapat menjadi antivirus kebanggaan
Indonesia.

Untuk Mengunduhnya bisa klik link Anti Virus dalam Blog saya ini

15 March 2009

To increase the capacity of RAM on your computer With Ebooster


Ebooster 3.0


To increase the capacity of RAM on your computer is using the application software Eboostre 3.0. Software can make your hard drive or flash RAM to be additional, ie ram is 256 Mb RAM with Ebooster you can be more than 1 Gb notes with your hard drive or flash memory has more than 1 Gb. So, you can increase RAM to your favorites. Windows Vista also has the ability, because Windows Vista has an application called Ready Boost. Usage is the same as ebooster, but ebooster can also run in Windows XP and Windows Vista and Windows 7.


eBoostr Installation File

* Version: 3.0 build 491
* Filesize: 2.2 MB
* Release Date: January 28th, 2009
* Available in 39 languages including Bahasa Indonesia

System Requirements

* Windows Vista, Windows XP, Windows 2000 *, Windows 2003 Server, Windows 2008 Server, Windows 7 Beta (all 32 and 64 bit systems supported)
* USB 2.0 port version or memory card reader
* Flash drive or memory card with at least 2.5 MB / sec random read speed
* Windows 2000 Service Pack 4 and Update Rollup 1 for SP4 are required

For Download this software click : Ebooster